Upload a Sketch to Arduino From Visual Studio

Visual Studio Code (VS Lawmaking) is a very popular general-purpose Integrated Evolution Environment (IDE). An IDE is a software that integrates a text editor, programming interface, debug view, and project management in ane place. The open-source project is led by Microsoft and runs on all operating systems. What makes VS Code the favorite option of all developers is how fast it runs, the customizations, and the availability of awesome extensions that extend the capabilities of the software. I such extension is the Arduino Extension developed past Microsoft itself.
In this tutorial, we will larn how to use VS Code and its extensions to develop Arduino projects and upload them to your Arduino boards direct, without using the Arduino IDE.
- Why Use VS Code for Arduino?
- Installing VS Code
- Workspace
- Installing Arduino Extension
- Opening Arduino Sketch
- Compiling and Uploading
- Tips & Tricks
- Recommended Extensions
- Links
- Brusk Link
Why Use VS Code for Arduino?
The Arduino IDE v1.8 has very limited capabilities in terms of features required for a modern IDE. Merely it is washed and so by choice. Arduino'southward goal is to make engineering less daunting for non-tech-related folks. So simplicity and ease of use are the priorities. Arduino is developing a newer and much more capable IDE version 2, and it is in beta mode equally of writing this article. So while that is in the works, nosotros can utilise the most modern VS Lawmaking IDE with its rich features to develop Arduino projects. If you have non used whatever IDEs other than Arduino IDE, this is a good place to learn how to showtime and what you lot can accomplish with VS Code. Some of the great features of VS Lawmaking are,
- Free and Open-source: You don't demand to pay for downloading and getting updates.
- Cantankerous-platform: VS Code runs on almost all platforms and you lot get seamless updates.
- Extremely Fast and Lightweight: Even though written mostly in Javascript and Typescript, VS Code runs fast on your computer while consuming fewer resources.
- About-infinite Customization: VS Code uses text-based JSON files for configuration and almost any feature of VS Lawmaking can be customized by updating the JSON settings files.
- Awesome Extensions: VS Code has a market for extensions/plugins developed by both Microsoft and other developers. Extensions extend the capabilities of VS Code. The underlying web technologies used for VS Code make it easy to develop powerful extensions.
- Beautiful Themes and Icons: VS Code is highly customizable in its appearance; from fonts to icons. Themes and icon packs tin can be downloaded from the extension marketplace.
- Integrated Consoles/Terminals: You don't need to leave VS Code window to run your console applications such as Powershell. Terminals are an integrated feature of VS Code and you can run multiple terminals at the same time.
- Integrated Git Version Control: Versioning your projects is easy with VS Lawmaking.
- Integrated Github Syncing: You tin sign in with your GitHub business relationship and button/pull your projects from GitHub.
- Rich Text Editor: The text editor comes with powerful editing features that help you type, copy, paste, duplicate, notice, and replace items much faster than conventional text editors. VS Code tin selectively use syntax highlighting depending on the blazon of file opened.
- Code Completion: VS Code can suggest function names, variables, class names, keywords, etc. equally yous start typing. If yous cull a proposition that is a snippet, VS Lawmaking volition automatically create the bones construct/template for that keyword. For example, a
switchkeyword will create a new switch construct with brackets and right indentations. - Lawmaking IntelliSense: VS Lawmaking tin can browse your project dependencies, locate where they are and observe code references from all those files. You can hover over an particular to encounter its value or reference and Ctrl + Left Click to open the reference.
Installing VS Code
To get started, first download VS Code for your preferred OS. We accept installed VS Code on our Windows 11 64-bit laptop.
Run the installer and cull a path on your system. By default, VS Lawmaking is installed netherC:\Users\{Username}\AppData\Local\Programs\Microsoft VS Code. More than information on installing can exist constitute hither. Once installed launch VS Code from your desktop or main menu. You will be welcomed with the getting started page. The screen you will see will be dissimilar from ours. Considering we have customized the looks and functionalities of our VS Code.
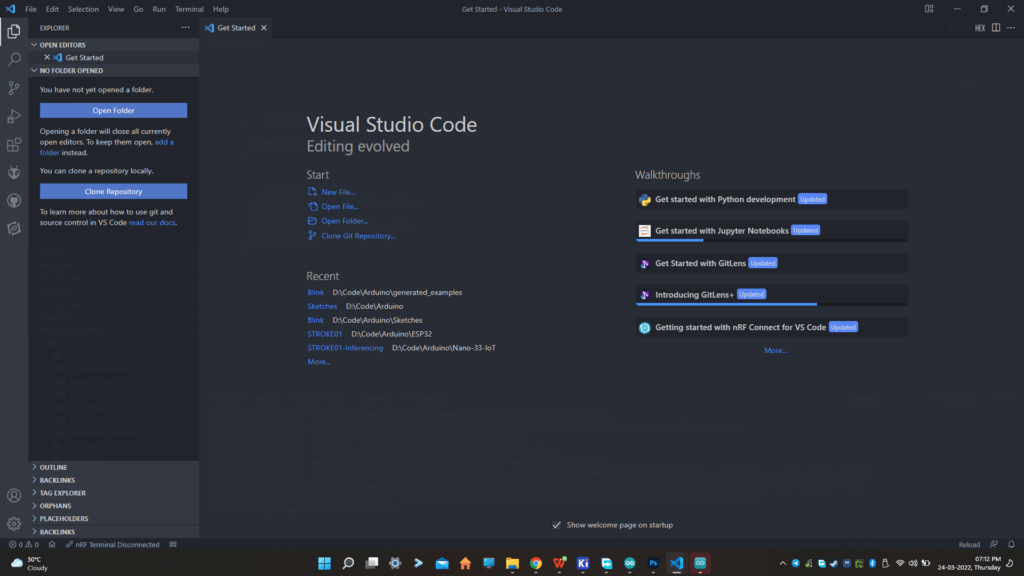
The basic layout is as follows,
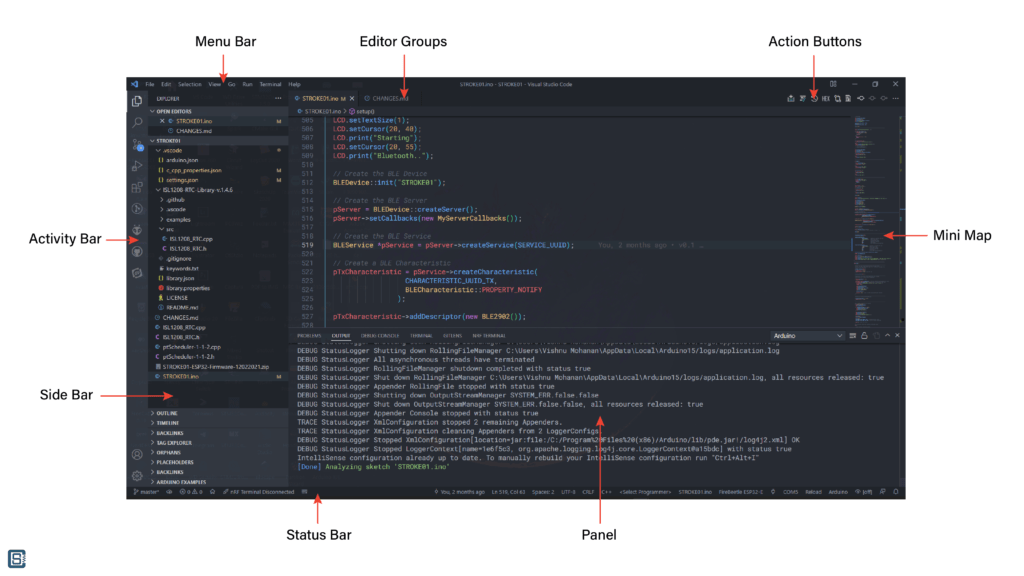
VS Code comes with a elementary and intuitive layout that maximizes the infinite provided for the editor while leaving ample room to browse and access the full context of your folder or project. The UI is divided into five areas:
- Editor – The chief area to edit your files. Y'all can open as many editors as you like side by side vertically and horizontally.
- Side Bar – Contains unlike views like the Explorer to assist you lot while working on your projection.
- Condition Bar – Information nigh the opened project and the files yous edit.
- Activity Bar – Located on the far left-mitt side, this lets you lot switch between views and gives yous additional context-specific indicators, similar the number of outgoing changes when Git is enabled.
- Panels – You can display different panels beneath the editor region for output or debug information, errors and warnings, or an integrated terminal. Panel can also exist moved to the right for more than vertical space.
- Activity Buttons – Allows you to perform various tasks provided by the extensions.
Each time y'all start VS Code, information technology opens up in the same state it was in when you last closed it. The binder, layout, and opened files are preserved. Open files in each editor are displayed with tabbed headers (Tabs) at the summit of the editor region.
Workspace
In VS Code, a workspace refers to a folder where your project files are stored. When y'all open a folder, all the files and folders within that root binder volition be displayed on the file explorer on the sidebar. Yous can create new files, and delete or rename files right from the sidebar. VS Code will automatically create a folder called .vscode to store configuration files and temporary files.
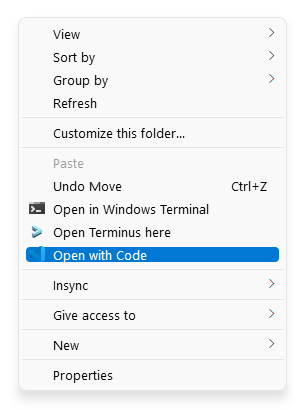
In Windows, you tin can right-click on an empty space in a folder in file explorer to open the context menu and utilise Open with Code selection to open up a folder as a workspace. You tin also open a folder from File menu.
Installing Arduino Extension
The Arduino extension is developed by Microsoft. You can install it from the extension marketplace. Launch VS Code and from the Extensions card (Ctrl + Shift + X) search for "Arduino". Install the Arduino extension. Subsequently installing, reload the IDE.
You need to have either Arduino IDE and Arduino CLI already installed in your system in order for the Arduino extension to VS Code to piece of work.

The master features of the Arduino extension of VS Code are,
- IntelliSense and syntax highlighting for Arduino sketches
- Verify and upload your sketches in Visual Studio Lawmaking
- Built-in board and library managing director
- Born example list
- Born serial monitor
- Snippets for sketches
- Automatic Arduino project scaffolding
- Control Palette (F1) integration of ofttimes used commands (due east.yard. Verify, Upload…)
- Integrated Arduino Debugging
Installting the Arduino extension along with other extensions such as PlatformIO can create conflicts as these extensions will try to have control of the workspace and files simulatenously. Therefore it is a good idea to disable PlatformIO or other conflicting extensions on your Arduino workspace. You can exercise this by clicking on the small-scale cog icon on the extension and cull Disable (Workspace) option. You should also disable the Arduino extension when working with PlatformIO projects.
Opening Arduino Sketch
To start using the Arduino extension, you lot first need to open up a folder that contains a .ino file. The Arduino extension will be activated on a workspace with at least one .ino file. Nosotros volition create a folder chosen Blink in our Sketches folder and open it with VS Lawmaking.

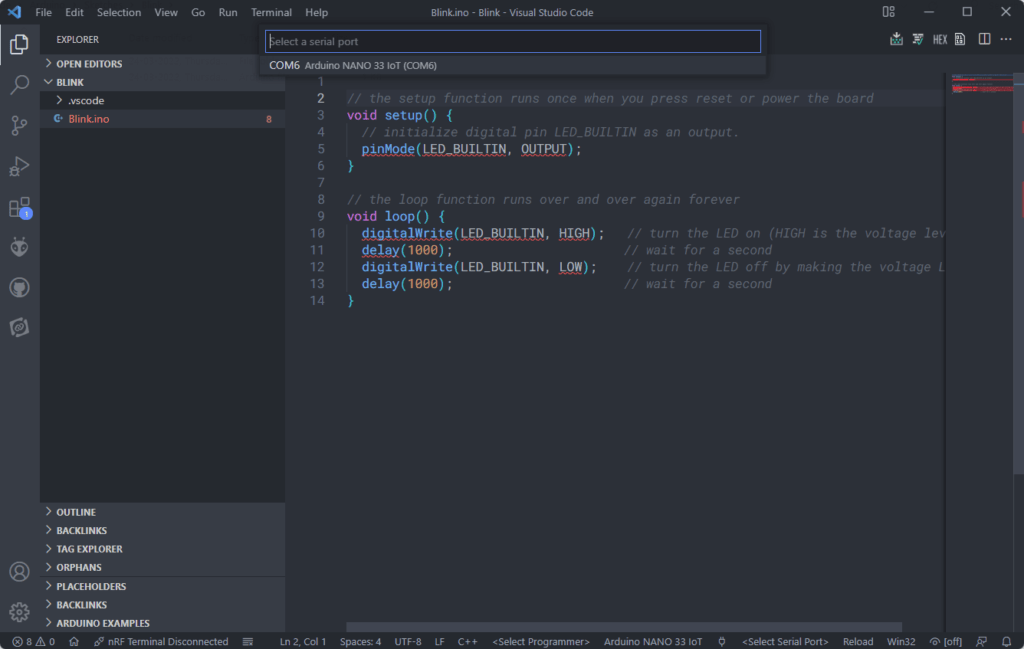
When y'all beginning open the sketch, the Arduino extension would non have configured the workspace for Arduino projects. To configure the workspace, first past selecting the board you are trying to use. Find the <Select Board> button on the right side of the condition bar and click on it. A new tab will open on the right side, where you can search for the board. Hither, we are using the Arduino Nano 33 IoT for running our examples.

You can see the blood-red squiggly underlines on the code. The squiggles are added by the Arduino IntelliSense and they indicate errors. Yous can see what the error is by hovering over the text. Since nosotros don't accept any syntactical or logical errors in the code we just created, these squiggles will disappear once the IntelliSense is configured correctly.
Next, we need to choose the serial port to which the board is connected. You can click on the <Select Series Port> button on the status bar to select a port from a list of available ports.
Since we are not using whatsoever external programmers, nosotros don't need to set up a programmer. Y'all must also notice that the status bar has an item chosen Win32. This indicates that the current workspace is expecting a Windows 32-bit C/C++ project from the contents of the file we opened. But nosotros actually need a different configuration for compiling Arduino sketches. Luckily, the Arduino extension can create this for the states. Simply open the Command Palette with the shortcut Ctrl + Shift + P and start typing "rebuild intellisense configuration". Equally presently every bit yous start typing it VS Code will fetch a list of like commands, from which y'all can select the Arduino: Rebuild IntelliSense Configuration or press Ctrl + Alt + I. If that doesn't piece of work for some reason, use Arduino:Verify (Ctrl + Alt + R) pick to start compiling the sketch. This will generate a new Arduino configuration in the c_cpp_properties.json file. Then reload VS Code.
This will open up a new OUTPUT panel and start printing lots of text messages. What is happening the Arduino extension is trying to detect the dependencies from the Arduino packages and use them to build the IntelliSense data. The dependencies tin can include header files, libraries, source files, or other configuration data. Once the analysis is complete, the Arduino extension will create a new configuration called arduino.json and save it to the .vscode binder. The previous Win32 item on the status bar volition now change to Arduino. In case it did not change, y'all tin can restart the VS Code for the changes to have issue. The fault squiggles will also disappear now.

Let'south explain a few things you can see at different locations on the window.
- On the sidebar file explorer menu, yous can see the configuration files (JSON files) created by VS Code that are within the .vscode folder. They are automatically generated and updated by VS Code when you update the settings from whatsoever other place.
- At the bottom of the sidebar, there is a list of items that can be expanded. These are C/C++ code explorer windows. Amidst them is the ARDUINO EXAMPLES. This list is provided by the Arduino extension and you can open all Arduino examples from in that location.

- Ln eleven, Col 26 indicates the line and column of the cursor location.
- Spaces: 2 indicates the number of spaces used for motorcar-indentation.
- LF indicates the cease of line sequence is Linefeed character.
- C++ indicates the language mode.
- Glimmer.io indicates the electric current file active for compilation. And yep, you can open up multiple Arduino sketches in dissimilar folders and you can cull which one to compile. This makes it piece of cake to manage multiple Arduino sketches at one time.
- Clicking Reload will reload VS Lawmaking. Yous need to install the Reload extension for this.
- On the action buttons section, there are 2 buttons that say Arduino:Upload (Ctrl + U) and Arduino:Verify (Ctrl + Alt + R). These buttons are placed by the Arduino extension and you tin can apply them to compile and upload your sketches to the selected board.
Compiling and Uploading
With that much explanation, nosotros can now go on to compile and upload the glimmer sketch. Click the Arduino:Upload to button to compile and upload the sketch to your lath. The OUTPUT window will open automatically and impress all the messages generated during the process.
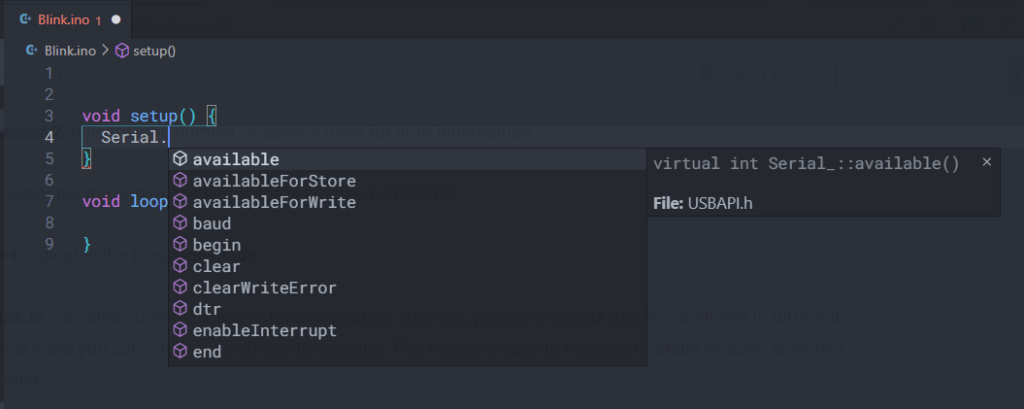
At present permit's write a small Serial Call-Response sketch to examination the series monitor feature of VS Code. Nosotros should initialize the serial port with brainstorm() function. And look how VS Lawmaking is suggesting the functions every bit soon every bit we type Serial... This is possible considering IntelliSense knows where these functions are located and automatically fetches them as we start typing.
Upload the following code and open the serial monitor by pressing the plug icon in the status bar.
void setup() { Serial.begin(115200); while(!Serial); } void loop() { if (Series.available()) { Cord inputString = Serial.readString(); Serial.println(inputString); } } 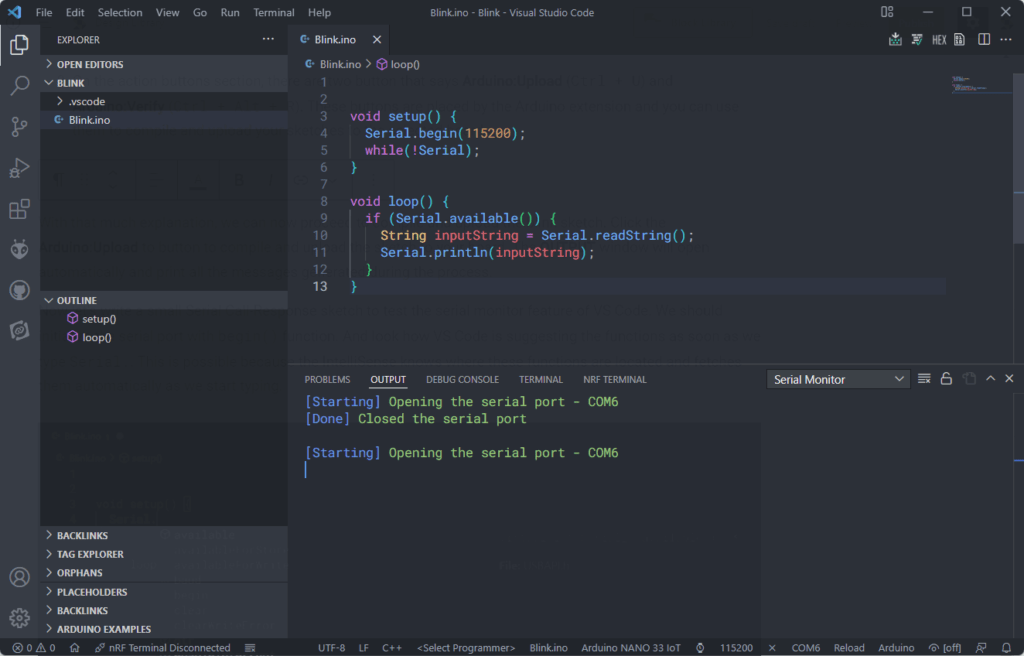
The code is supposed to repeat whatever we send to the device. Merely what exercise we get? Zip! The serial monitor is the weakest feature of the Arduino extension. It doesn't give even the basic features provided by the Arduino Serial Monitor. You can not even compose a message before sending information technology or utilize custom line endings for what you send. Then stick with Arduino Series Monitor.

Tips & Tricks
Beneath is a listing of tips and tricks nosotros know of. You lot can assist the states expand this list if you know more tricks to save fourth dimension and increase productivity.
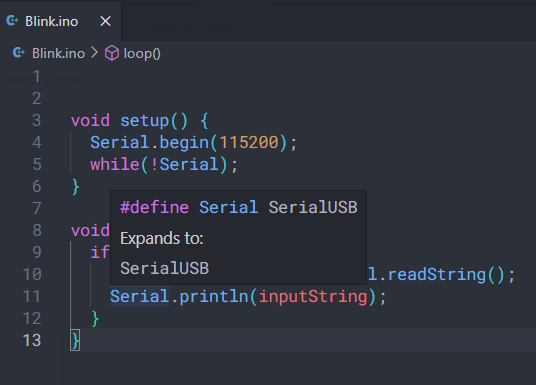
- Hover over whatsoever item to see its declaration and press Ctrl key while hovering to see the role of the definition of the item.
- Ctrl + Left Click on an item opens its reference. If there are multiple references, you will get an interactive list of them.
- User Arduino IDE'south Use external editor feature to always use VS Code as the editor. This volition sync changes fabricated in VC Code to the Arduino IDE.
- Use Alt + Up / Downwardly arrow keys combinations to move the active lines to upward or down.
- User Alt + Left Click to place a cursor anywhere on the file and start typing at multiple locations at once.
- Use Ctrl + Left / Correct pointer keys to move the cursor through words than letters. Use the Shift cardinal in combination with this to select the line instead of just moving the cursor.
- Use Ctrl + Backspace to delete blocks of characters.
- Use Shift + Dwelling to the active line to the leftmost non-whitespace character. This helps to hands rewrite the current line.
- Apply Ctrl + L to select the entire agile line.
- Apply Ctrl + Shift + K to delete a line.
- Employ Shift + Alt + Up / Downward keys to indistinguishable the current line.
- To copy an entire line, you don't need to select it. Instead, simply press Ctrl + C when the cursor is anywhere on the line.
- Similarly to cutting a line simply press Ctrl + Ten. This can also exist used to quickly delete a line.
- Press the curlicue wheel of your mouse and drag on your lawmaking to marquee select the code. This can also place multiple cursors at once.
- Use Tab to indent to right and Shift + Tab to indent to left.
- Use Ctrl + Shift + \ to leap to the matching bracket.
A consummate list of default shortcuts can be found here in this PDF.
Recommended Extensions
- Git History
- GitLens
- Insert Appointment String
- hexdump for VS Code
Links
- Download VS Lawmaking
- VS Code Arduino Extension – Marketplace
- Arduino Extension – Github
- VS Code Shortcuts – PDF
Brusque Link
- Short URL to this folio – https://circuitstate.com/vscardu
Source: https://circuitstate.com/tutorials/how-to-use-vs-code-for-creating-and-uploading-arduino-sketches/
0 Response to "Upload a Sketch to Arduino From Visual Studio"
إرسال تعليق